Order block and breaker block
The zones where big players loaded their orders, and their variant, the breaker block.
The order block (OB)
An order block (OB) is a zone where large players built up a massive volume of orders that triggered an explosive move. You can use OBs as support or resistance, and buy or sell them when price comes back to test them.
Bullish and bearish OB
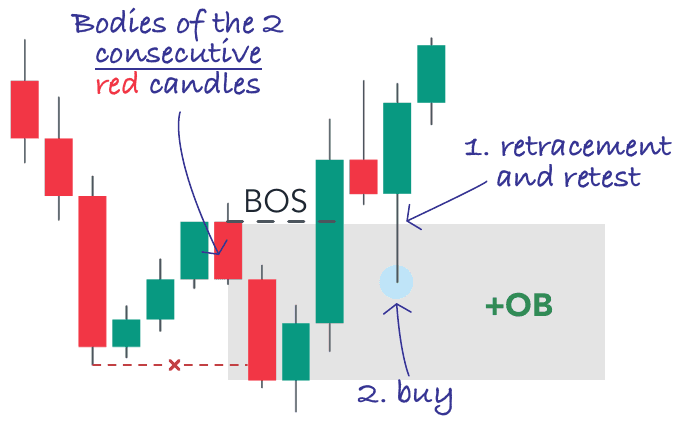
The bullish OB (+OB) is the body of the last red candle, or group of red candles, before a powerful bullish move. It acts as a buy zone (support) when price comes back to test it (retracement).
The bearish OB (-OB) is the body of the last green candle, or group of green candles, before a powerful bearish move. It acts as a sell zone (resistance) when price comes back to test it.
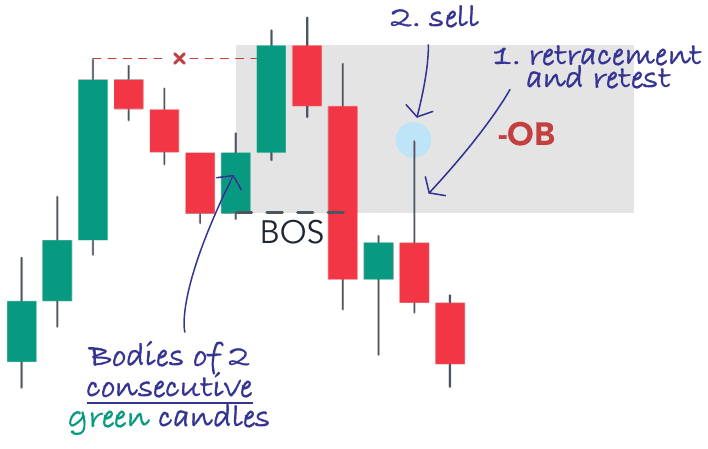
If you switch timeframes, the number of candles changes. On M30 you will see one candle where M15 shows two, and M5 even more. The zone itself doesn't change.
Three criteria for a reliable OB
Not every OB is relevant. Like FVGs, you see them everywhere. To be considered reliable, an OB should ideally meet three conditions:
- 1Liquidity sweep: the OB must form after price has taken liquidity above an important high or below an important low. That liquidity is the fuel for the move that follows.
- 2BOS or MSS: the move out of the OB must break market structure, the last significant high or low. That break confirms the OB is active.
- 3FVG and premium/discount: ideally, an FVG forms right after the OB. And to be usable, a +OB should sit in discount, a -OB in premium.
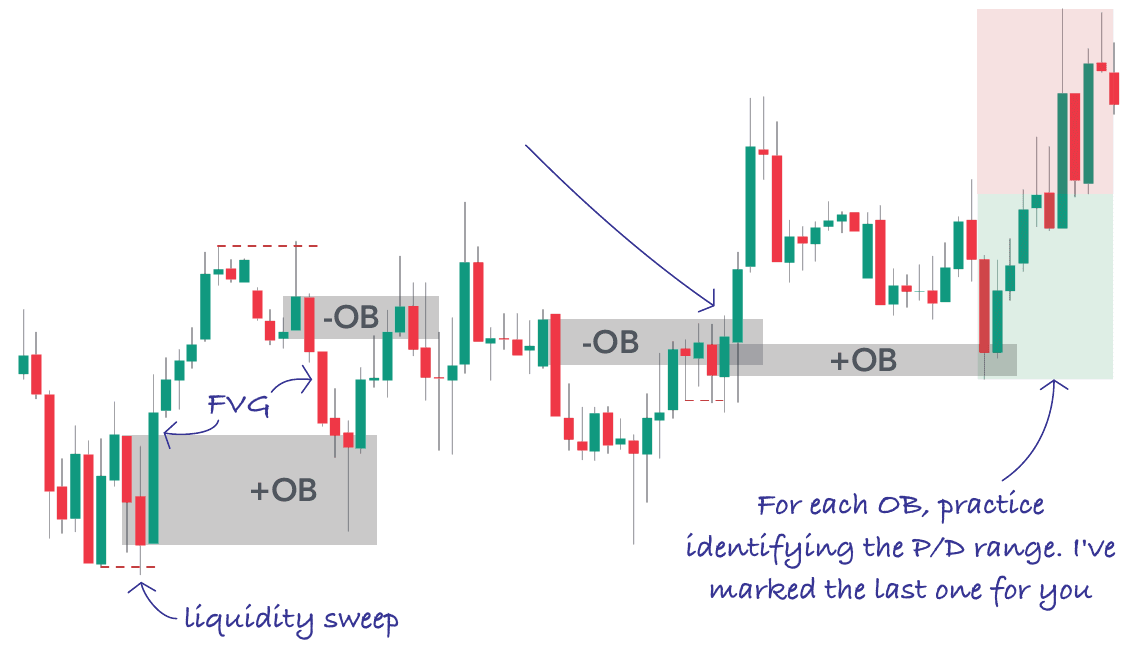
Examples of valid OBs. The third one is interesting: it is valid, but it eventually gave way to buying pressure. You can see price spending time there, absorbing all the selling pressure and ending up trading above it. For each OB, practise identifying the premium and discount range; the last one is drawn for you.
Mitigated and unmitigated OB
An unmitigated OB is intact: price hasn't touched it yet. That is the one you are most interested in.
A mitigated OB is one that price has traded all the way through. It loses its role as support or resistance: move on.
Same nuance as with FVGs: a partially touched OB remains valid. Price can tap it, bounce, then come back deeper into it. As long as there hasn't been a close beyond it, the OB is still active.
Entries and stop loss
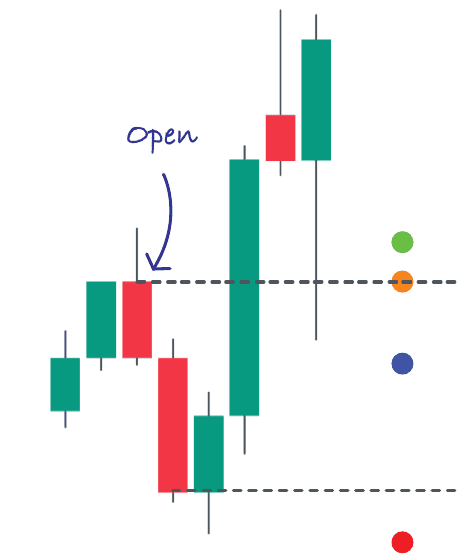
- Entry, option 1: at the edge of the OB, at the open. The most common one.
- Entry, option 2: in the wick, when you expect a powerful OB that won't need to dig deep.
- Entry, option 3: a market order inside the OB, after confirmation on the LTF.
- Stop loss: at the far end of the OB.
Watch this: if an OB is solid, price shouldn't need to dig deep. As with FVGs, price ideally doesn't go past the 50% level. The deeper it digs, the worse the sign. If price closes beyond the body, and especially beyond the wick, your idea is probably invalidated.
Not all OBs are equal. An OB without a liquidity sweep and without a BOS is just a candle. Don't trade it.
The breaker block (BB)
A breaker block (BB) is a former OB that has been invalidated and switches roles. The old support zone becomes resistance, and vice versa. It signals a change of direction.
Bullish and bearish BB
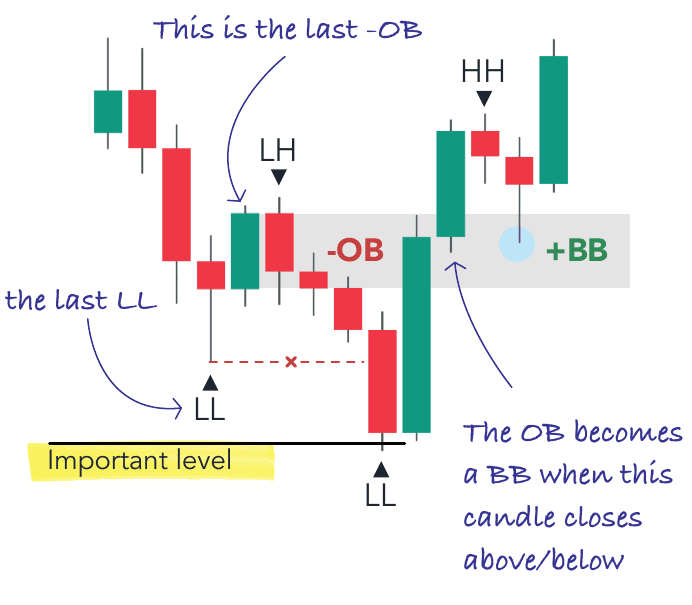
The +BB follows the sequence LL, LH, LL, HH, then retest. Find the last -OB that caused the break of the last LL, before price tagged an important level. When price closes above that -OB, it becomes a +BB: the former -OB, which was a sell zone, becomes a buy zone.
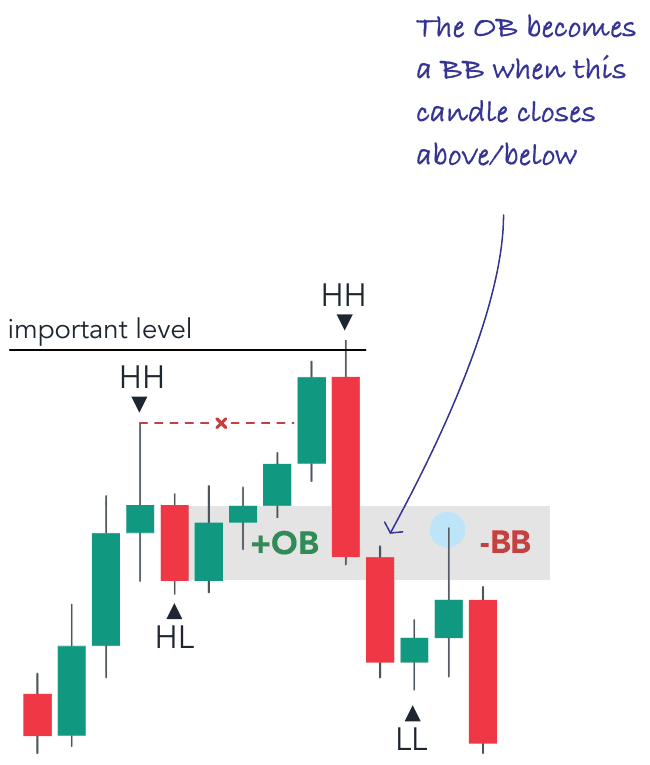
The -BB follows the sequence HH, HL, HH, LL, then retest. It is the reverse: find the last +OB that caused the break of the last HH, before price tagged an important level. When price closes below that +OB, it becomes a -BB: the former +OB, which was a buy zone, becomes a sell zone.
Three criteria for a reliable BB
- 1Key HTF level: the BB must form at a key level of a higher timeframe. Work in this order: first identify your zone on the HTF (discount or premium, OTE, old high or low), then drop to a lower, easier-to-read timeframe to look for the BB.
- 2Liquidity sweep: the BB forms after a liquidity grab. That fuel powers the impulsive move.
- 3MSS: the move out of the key level triggers an MSS. That break confirms the BB is active.
Once the MSS is in, price often comes back to test the zone (the BB) before continuing on its new path. The retest is reinforced by confluences, such as an FVG inside the BB (the unicorn formation) or around it.
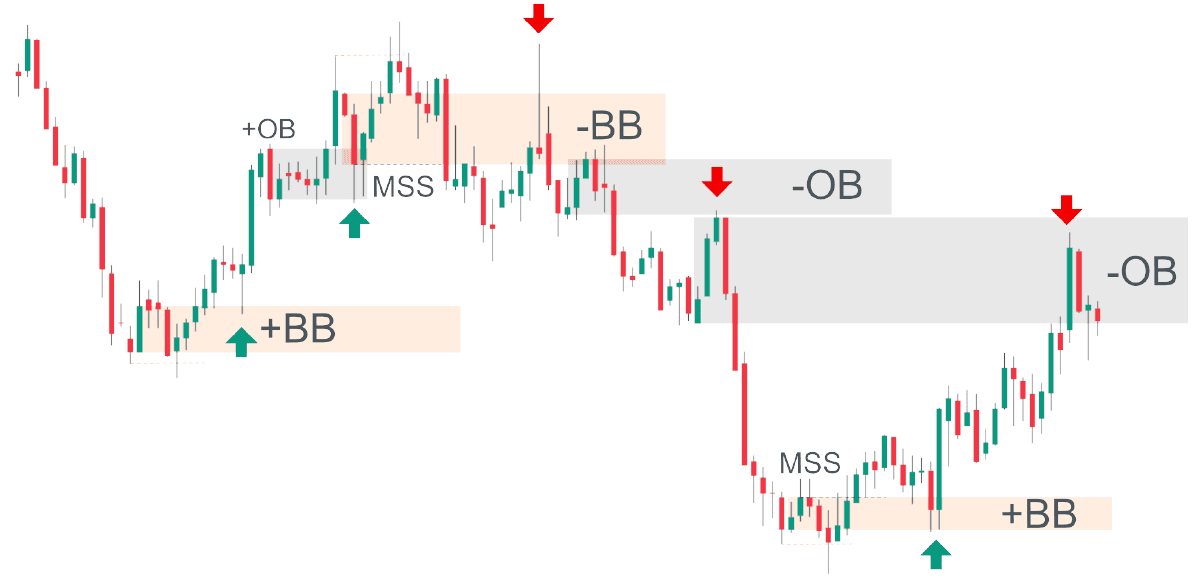
For the entry, the stop loss and mitigated or unmitigated BBs, apply exactly the same rules as for OBs.
The BB marks the exact moment an old zone switches roles. That is where structure tips over, where liquidity has been taken and where the smart money repositions. Learn to spot it and you will be on the right side from the very start of the move.
The rest is in the book
Beat the Market with SMT Divergences
These pages are the first part of the book. The rest answers the two questions that matter: which pair to trade, and when to enter.